What is Solder Mask and Why is it Important?
Solder mask, also known as solder resist or solder stop mask, is a thin lacquer-like layer of polymer usually applied to the copper traces of a printed circuit board (PCB) for protection against oxidation and to prevent solder bridges from forming between closely spaced solder pads. It serves several critical functions:
- Prevents solder from bridging between conductors
- Protects copper from oxidation and contamination
- Provides electrical insulation
- Helps the user identify the different components and tests points on the PCB
- Improves the aesthetics and makes the PCB look more professional
Without solder mask, the exposed copper on a PCB would quickly oxidize, leading to poor solderability and potential issues like shorts or poor connections. The solder mask ensures the long-term reliability and functionality of the circuit board.
Common Causes of Solder Mask Damage
Despite its durability, the solder mask on a PCB can get damaged due to various reasons:
-
Mechanical abrasion: Handling the PCB roughly, using sharp tools near the board surface, or allowing it to rub against other objects can scratch or scrape off the solder mask.
-
Chemical exposure: Certain chemicals, if accidentally spilled on the PCB, can eat away or dissolve the solder mask. These include strong acids, bases, solvents, and even some cleaning agents if left on the surface for too long.
-
Heat damage: Applying excessive heat during soldering or rework can cause the solder mask to blister, flake, or burn off. Using a soldering iron with too high a temperature or keeping it in contact with the board for an extended time can lead to such damage.
-
Manufacturing defects: Sometimes, the solder mask may have pinholes, cracks, or incomplete coverage due to issues in the PCB fabrication process. These defects can expose the underlying copper and lead to future problems.
-
Age and environmental factors: Over time, exposure to UV light, high humidity, or extreme temperatures can degrade the solder mask, causing it to become brittle, crack, or peel off.

Assessing the Extent of Solder Mask Damage
Before attempting to repair the solder mask, it’s important to assess the extent and nature of the damage. Here’s how you can go about it:
-
Visual inspection: Carefully examine the PCB under good lighting, using a magnifying lens if necessary. Look for any obvious signs of damage, such as scratches, pits, or missing solder mask. Check if the copper is exposed or if there are any signs of corrosion.
-
Continuity testing: Use a multimeter to check for continuity between adjacent traces or pads that should not be connected. If there is continuity where there shouldn’t be, it could indicate a solder bridge or exposed copper due to missing solder mask.
-
Microscopic examination: For more detailed analysis, use a microscope to get a closer look at the damaged area. This can help you determine the extent and nature of the damage more accurately.
Based on the assessment, you can decide whether the solder mask damage is repairable or if the PCB needs to be replaced entirely.

Methods for Repairing Solder Mask
If the damage to the solder mask is minor and localized, you can attempt to repair it using one of the following methods:
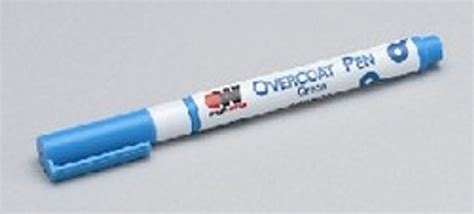
1. UV Curable Solder Mask
UV curable solder mask is a liquid photopolymer that hardens when exposed to ultraviolet light. It is the most professional and reliable method for repairing solder mask. Here’s how you can use it:
- Clean the damaged area with isopropyl alcohol and allow it to dry completely.
- Apply a thin layer of UV curable solder mask over the damaged area using a fine brush or applicator. Make sure to cover any exposed copper completely.
- Cure the solder mask by exposing it to a UV light source for the recommended time (usually a few minutes).
- If necessary, apply a second coat and cure again.
- Clean any excess or spills with isopropyl alcohol.
| Advantages | Disadvantages |
|---|---|
| Provides a strong, durable repair | Requires special UV curable solder mask and UV light source |
| Closest to the original solder mask in terms of properties | Can be expensive for small repairs |
| Suitable for larger areas of damage | Takes some time and effort to apply properly |
2. Epoxy Resin
Two-part epoxy resins can be used as a makeshift Solder Mask Repair material. They provide good insulation and protection, although not as durable as UV curable solder mask. Here’s the process:
- Mix the two parts of the epoxy resin as per the manufacturer’s instructions.
- Apply a thin layer of the mixed epoxy over the damaged area, covering any exposed copper.
- Allow the epoxy to cure fully, which usually takes several hours at room temperature.
- Sand down any excess epoxy to make it flush with the surrounding solder mask.
| Advantages | Disadvantages |
|---|---|
| Easily available and affordable | Not as durable as UV curable solder mask |
| Provides good insulation and protection | Can be messy to apply and difficult to control the thickness |
| Suitable for small repairs | Requires sanding to level with the surrounding area |
3. Nail Polish or Liquid Electrical Tape
In a pinch, clear nail polish or liquid electrical tape can be used for very small solder mask repairs. While not a permanent solution, they can provide temporary insulation and protection. Here’s how to use them:
- Clean the damaged area with isopropyl alcohol and let it dry.
- Apply a thin coat of clear nail polish or liquid electrical tape over the exposed copper, being careful not to get it on the surrounding components.
- Allow it to dry completely before handling the PCB further.
| Advantages | Disadvantages |
|---|---|
| Readily available and inexpensive | Not a durable or long-lasting solution |
| Easy to apply | Can be difficult to remove if further rework is needed |
| Suitable for very small, temporary repairs | May not provide adequate insulation or protection |

Tips for Successful Solder Mask Repair
To ensure a successful and long-lasting solder mask repair, keep these tips in mind:
-
Always clean the damaged area thoroughly before attempting any repair. Use isopropyl alcohol and a lint-free cloth to remove any dirt, grease, or residue.
-
Choose the repair method based on the extent of the damage and the resources available to you. UV curable solder mask is the best option for larger, more critical repairs.
-
Apply the repair material carefully, making sure to cover all the exposed copper without getting it on the surrounding components or solder pads.
-
Allow sufficient time for the repair material to cure or dry completely before handling the PCB or exposing it to any stress.
-
If possible, test the repaired area for continuity and insulation resistance to ensure the repair is effective.
-
Consider applying a conformal coating over the repaired area for added protection, especially if the PCB will be exposed to harsh environments.
When to Consider PCB Replacement
While solder mask repair can be effective for minor damage, there are situations where it’s better to consider replacing the PCB entirely:
-
If the damage is extensive, covering a large area of the PCB or multiple layers, repair may not be practical or reliable.
-
If the PCB is critical to the functioning of a system and the reliability of the repair cannot be guaranteed, replacement is the safer option.
-
If the PCB has other issues besides solder mask damage, such as lifted pads, broken traces, or component damage, repair may not be sufficient to restore full functionality.
-
If the cost and effort of repairing the solder mask outweigh the cost of a new PCB, replacement may be more economical in the long run.
FAQ
1. Can I use regular paint or marker to repair solder mask?
No, using regular paint or marker is not recommended for solder mask repair. They do not provide the necessary insulation, protection, or durability required for a reliable repair. Always use materials specifically designed for PCB repairs, such as UV curable solder mask or epoxy resin.
2. Is it safe to use a PCB with damaged solder mask?
It depends on the extent and location of the damage. If the damaged area is small and not critical to the functioning of the circuit, the PCB may still be usable with caution. However, if the damage is extensive or exposes sensitive components or traces, it’s safer to repair the solder mask or replace the PCB to avoid potential short circuits or other issues.
3. How long does solder mask repair last?
The longevity of a solder mask repair depends on the method and material used, as well as the environment the PCB is exposed to. UV curable solder mask repairs can last for several years if done properly, while epoxy resin repairs may last for a few years under normal conditions. Temporary repairs with nail polish or liquid electrical tape may only last a few months at best.
4. Can I apply solder mask repair on top of existing solder mask?
Yes, you can apply solder mask repair material on top of the existing solder mask, as long as the surface is clean and free of any contaminants. However, keep in mind that the repaired area may not be level with the surrounding solder mask, which could affect the aesthetics of the PCB.
5. How can I prevent solder mask damage in the future?
To prevent solder mask damage, handle PCBs with care, avoiding any sharp objects or abrasive surfaces. Use appropriate tools and techniques when soldering or reworking components, and avoid applying excessive heat. Store PCBs in a clean, dry environment away from direct sunlight or extreme temperatures. If the PCB will be exposed to harsh conditions, consider applying a conformal coating for added protection.
Conclusion
Solder mask plays a crucial role in protecting the copper traces on a PCB and ensuring its long-term reliability. While it is a durable layer, solder mask can get damaged due to various factors such as mechanical abrasion, chemical exposure, or heat. Assessing the extent of the damage is important before attempting any repair.
For minor solder mask damage, repair methods such as UV curable solder mask, epoxy resin, or even nail polish can be effective. However, for extensive damage or critical PCBs, replacement may be the safer and more economical option in the long run.
By following the tips and guidelines outlined in this article, you can successfully repair solder mask damage and extend the life of your PCBs. Regular inspection, careful handling, and proper storage can help prevent solder mask damage in the future.


Leave a Reply