Introduction to PCB X-Ray Inspection
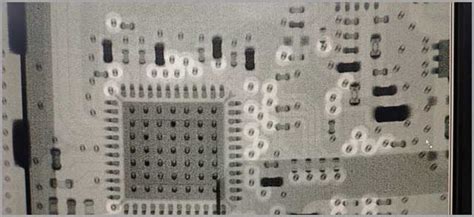
Printed Circuit Board (PCB) X-ray inspection is a non-destructive testing method used to inspect the internal structure of PCBs for defects or quality issues. It uses high-energy electromagnetic radiation to penetrate through the PCB and produce an image of its internal structure on a detector. This allows manufacturers to detect issues such as broken traces, voids, misaligned components, insufficient solder, and more that may not be visible from the outside.
X-ray inspection is especially important for PCBs with high component density, fine pitch leads, or hidden solder joints underneath BGA packages. It provides a way to verify proper assembly and catch potential reliability issues early in the manufacturing process before the boards are shipped to customers.
How PCB X-Ray Works
In PCB X-ray inspection, the board is placed between an X-ray source and a detector. Short wavelength X-rays are emitted from the source, pass through the PCB, and are picked up by the detector on the other side. Denser materials like copper traces and solder absorb more of the X-rays while the PCB substrate lets more X-rays pass through. This difference creates contrast in the X-ray image.
The X-ray image is digitally processed and analyzed, often with the help of automated inspection software, to look for anomalies. The PCB design CAD files are used as a reference to compare against. Any discrepancies between the X-ray and the intended design could indicate an issue.
Benefits of X-Ray Inspection for PCBs
X-ray inspection provides several key benefits for ensuring PCB Quality and reliability:
- Non-destructive testing – boards can be inspected without damaging them
- Sees hidden features – can image solder joints and traces sandwiched between board layers
- Finds subtle defects – detects issues like small voids that visual inspection would miss
- Fast and inline capable – X-ray systems can keep up with production and be integrated inline
- Saves costs – detecting assembly issues early avoids expensive rework or product failures later
PCB X-Ray Inspection Equipment
X-ray inspection systems for PCBs use an X-ray source, an image detector, a positioning system to manipulate the board undertest, and software to analyze the X-ray image. There are several types of systems available.
2D X-Ray Systems
2D X-ray inspection provides a projection image through the board from one angle. The X-ray source and detector are stationary while the board moves in X and Y to image the full PCB area. 2D is good for checking general assembly and placement but has limitations in imaging overlapping features. It is the most basic type of X-ray inspection.
2.5D X-Ray Systems
2.5D X-ray takes angled 2D projection images of the board from multiple sides as it rotates. This provides more information about solder joint shape and helps separate overlapping features. It still requires some interpretation compared to a full 3D image. 2.5D is a good balance of speed and angular information.
3D X-Ray Systems
3D X-ray inspection, also known as X-ray computed tomography (CT), combines multiple projection X-ray images taken as the board rotates to reconstruct a full 3D model of the PCB. This provides complete visualization of the board from any angle. 3D X-ray is the most advanced but also generally the slowest method. It is used for challenging high-density boards and failure analysis.
X-Ray Inspection Resolution and Magnification
X-ray inspection systems are characterized by their resolution, or smallest visible feature size. This is a function of the X-ray source focal spot size, detector pixel size, and beam geometry. Systems with micro-focus or nano-focus X-ray tubes can resolve details down to a few microns.
Geometric magnification is achieved by placing the board closer to the X-ray source. The beam spreads out before reaching the detector, enlarging the image. Magnification is often adjustable to zoom and see more detail in an area of interest.
Common PCB Defects Found by X-Ray
X-ray inspection is used to find both assembly defects and board manufacturing defects. Some of the most common issues it detects include:
Solder Joint Defects
- Insufficient solder – not enough solder applied, can cause open or intermittent connection
- Bridging – solder mistakenly connecting two leads, causing a short
- Voids – bubbles or gaps in the solder joint, weakening the connection
- Head-in-pillow – an open caused by the BGA ball and PCB pad not collapsing together
Component Placement Issues
- Misalignment – component leads not centered on pads
- Tombstoning – one side of a chip lifts up due to uneven heating
- Billboarding – chip rotated or placed sideways
- Missing components – component absent from its appointed location
PCB Manufacturing Defects
- Broken traces – cracks in traces can cause opens
- Shorted traces – solder mask missing between traces
- Delamination – separation of PCB layers
- Drilling issues – misplaced or inaccurately sized holes

PCB X-Ray Inspection in China
China is a global hub for electronics manufacturing, including PCB fabrication and assembly. Many Chinese manufacturers offer X-ray inspection services to ensure product quality. Benefits of working with a Chinese supplier for PCB X-ray inspection include:
- Lower costs from operating in China’s manufacturing ecosystem
- Wide availability of X-ray equipment and expertise
- Ability to catch issues before PCBs are exported, avoiding international shipping delays
- Familiarity with inspecting PCBs from Chinese fabricators and assemblers
Well-known Chinese PCB manufacturers that provide X-ray inspection services include:
| Company | Location | X-Ray Capabilities |
|---|---|---|
| Kinwang | Dongguan | 2D, 3D CT |
| Fastline | Shenzhen | 2D, 2.5D |
| HYY PCB | Huizhou | 2D, 3D CT |
| EMA PCB | Shenzhen | 2D, 3D CT |
| ICAPE | Suzhou | 2D, 2.5D |
Many Chinese inspection labs also offer X-ray services for PCBs on a contract basis without manufacturing the boards themselves. This can provide an independent third-party assessment.
Choosing a Chinese PCB X-Ray Inspection Supplier
When selecting a Chinese company for PCB X-ray inspection services, consider the following:
- Technical capabilities – do they have the right type of X-ray systems for your needs?
- Experience – how long have they been doing X-ray inspection and with what types of PCBs?
- Quality certifications – are they certified to ISO 9001, IATF 16949, or other relevant standards?
- Industry specialization – do they have specific experience in your industry, like automotive, medical, etc?
- Turnaround time – how fast can they inspect your boards and provide results?
- Communication – is there a language barrier or time zone difference that could impact project discussions?
- Pricing – are their inspection fees competitive? Are there NRE or volume-based costs?
- Terms and conditions – what are their policies for payment, liability, intellectual property, etc?
It’s important to clearly communicate your specific PCB Inspection requirements and carefully vet potential suppliers to find the right fit for your project. Getting references, conducting on-site audits, and starting with smaller pilot projects can help validate a supplier before committing to a larger engagement.
Conclusion
X-ray inspection is a powerful tool for ensuring the quality and reliability of PCB assemblies. It allows manufacturers to non-destructively find defects hidden inside the board before they turn into bigger problems down the line.
China’s large electronics manufacturing base makes it a prime location to find PCB X-ray inspection services, whether bundled with fabrication and assembly or as a standalone service. Chinese inspection providers offer advanced X-ray technologies at an affordable cost.
When sourcing PCB X-ray inspection from China, carefully evaluate the supplier’s capabilities and track record to ensure they can meet your project’s technical and commercial requirements. Open communication and building a strong supplier relationship are keys to inspection success.
FAQ
What is the difference between 2D and 3D X-ray inspection for PCBs?
2D X-ray provides a projection image through the board from one angle, while 3D X-ray combines images from multiple angles to reconstruct a full 3D model. 2D is faster but can have difficulty separating overlapping features, while 3D gives complete visualization but takes longer. 2.5D is a compromise that takes angled 2D images from a few sides.
How much does PCB X-ray inspection cost in China?
The cost of PCB X-ray inspection in China varies based on board complexity, inspection system type, and testing volume. Simple 2D X-ray could start around $100 per board while detailed 3D CT on a complex board could be over $1000. Generally larger Chinese manufacturers will offer lower bundled pricing for inspection along with fabrication and assembly. Standalone inspection is priced per board or by the hour.
What are the X-ray inspection requirements for Automotive PCBs?
Automotive PCBs often have more stringent inspection requirements due to the safety-critical nature of the application. X-ray is used to verify proper solder joint formation, check for head-in-pillow opens in BGA joints, and look for voiding. Standards like IATF 16949 require defect tracking and statistical process control. AEC-Q104 specifically addresses automotive PCB qualification and references IPC-A-610 workmanship criteria.
How long does PCB X-ray inspection take?
The time required for PCB X-ray inspection depends on the board size, complexity, and X-ray system type. A simple 2D scan of a small board might take less than a minute, while a 3D CT reconstruction of a large complex board could take an hour or more. Inline 2D X-ray systems can typically keep up with a normal SMT production line beat rate. More detailed failure analysis with high resolution can take significant time for a large board.
What training is needed to operate PCB X-ray equipment?
PCB X-ray inspection equipment requires some specialized knowledge to operate effectively. Users need to understand X-ray safety protocols, image optimization techniques, and the PCB defect criteria used for pass/fail determination. Most X-ray system vendors offer detailed operation and maintenance training. Industry groups like IPC and SMTA also provide inspection training and certification resources. Automated optical inspection experience is also relevant. Chinese inspection service providers will have staff with appropriate training and certifications.


Leave a Reply