What is a Breadboard?
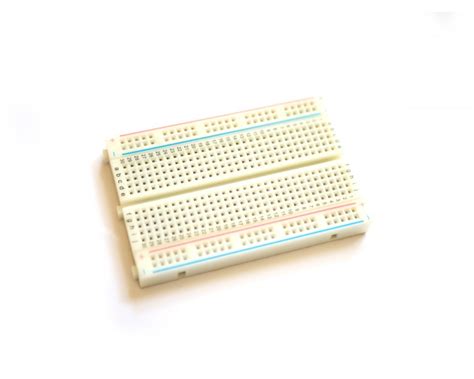
A breadboard is a rectangular plastic board with a grid of holes used for prototyping electronic circuits. It allows for the temporary construction and testing of circuits without the need for soldering. The name “breadboard” originated from the early days of electronics when engineers would literally use wooden boards to construct their circuits, with components attached to nails or screws driven into the board.
How Does a Breadboard Work?
A typical breadboard consists of a grid of holes, each connected to a metal clip underneath. These clips are arranged in a specific pattern to allow for easy connection of components. The holes are typically spaced at 0.1 inch intervals, which is the standard spacing for many electronic components.
The breadboard is divided into several sections:
| Section | Description |
|---|---|
| Power Rails | Two rows of holes running along the length of the board, typically marked with red (+) and blue (-) lines. These are used for connecting power supply voltages. |
| Component Rows | The main area of the breadboard, consisting of rows of holes. Each row is divided into two halves, with a gap in the middle. The holes in each half-row are electrically connected. |
To use a breadboard, components are inserted into the holes and connected using jumper wires. The components’ leads are held securely by the metal clips underneath the holes, allowing for a reliable electrical connection.
Advantages of Using a Breadboard
1. Quick and Easy Prototyping
Breadboards allow for rapid prototyping of electronic circuits. Components can be easily inserted, removed, and rearranged without the need for soldering. This makes it simple to experiment with different circuit configurations and troubleshoot issues.
2. Reusability
Since components are not permanently attached to the breadboard, they can be easily removed and reused in other projects. This makes breadboards an economical choice for prototyping, as components can be used multiple times.
3. No Soldering Required
Breadboards eliminate the need for soldering during the prototyping phase. This is particularly useful for beginners who may not have experience with soldering or for quick proof-of-concept projects where soldering would be time-consuming.

Limitations of Breadboards
1. Limited Current Capacity
Breadboards are designed for low-current applications. The metal clips and jumper wires have a limited current carrying capacity, typically around 1-2 amps. High-current circuits or power-hungry components may not be suitable for prototyping on a breadboard.
2. Frequency Limitations
Due to the inherent capacitance and inductance of the metal clips and jumper wires, breadboards are not suitable for high-frequency circuits. The added parasitics can introduce signal integrity issues and affect circuit performance at higher frequencies.
3. Mechanical Stability
Breadboards are intended for temporary prototyping and are not as mechanically stable as soldered circuits. Components can become dislodged if the breadboard is subjected to vibrations or rough handling.

Tips for Using a Breadboard
-
Plan your circuit layout before starting to place components on the breadboard. This will help you organize your components and make the circuit easier to understand and debug.
-
Use color-coded jumper wires to make connections between components. This will make your circuit more visually organized and easier to follow.
-
Keep your breadboard clean and free from debris. Dust and dirt can affect the electrical connections and cause issues with your circuit.
-
When inserting components or jumper wires, ensure they are fully seated in the holes. Loose connections can lead to intermittent or faulty behavior.
-
Double-check your connections before applying power to your circuit. Incorrect connections can damage components or cause unexpected behavior.

Common Breadboard Projects
Breadboards are widely used for a variety of electronic projects. Some common examples include:
-
LED circuits: Breadboards are often used to prototype simple LED circuits, such as blinking LEDs or LED arrays.
-
Sensor circuits: Breadboards are ideal for testing and prototyping sensor-based circuits, such as temperature sensors, light sensors, or motion detectors.
-
Microcontroller projects: Breadboards are commonly used to prototype circuits that interface with microcontrollers, such as Arduino or Raspberry Pi.
-
Motor control circuits: Simple motor control circuits can be prototyped on a breadboard, allowing for testing and experimentation before creating a permanent soldered circuit.
-
Audio circuits: Basic audio circuits, such as amplifiers or filters, can be prototyped on a breadboard for testing and refinement.
Transitioning from Breadboard to PCB
Once a circuit has been successfully prototyped on a breadboard, the next step is often to create a permanent printed circuit board (PCB). The process of transitioning from a breadboard to a PCB involves several steps:
-
Schematic capture: The first step is to create a schematic diagram of the circuit using electronic design automation (EDA) software. The schematic captures the electrical connections and components used in the breadboard circuit.
-
PCB layout: Using the schematic as a reference, the PCB layout is created in the EDA software. This involves placing components and routing traces to create the physical layout of the PCB.
-
PCB fabrication: The PCB layout files are sent to a PCB manufacturing service, which fabricates the physical PCB based on the provided design.
-
Component soldering: Once the PCB is fabricated, the components are soldered onto the board according to the schematic and layout.
-
Testing and debugging: The assembled PCB is tested to ensure it functions as intended. Any issues or bugs are identified and resolved at this stage.
Frequently Asked Questions (FAQ)
1. Can I reuse a breadboard after completing a project?
Yes, breadboards are designed to be reusable. Simply remove the components and jumper wires from the breadboard, and it can be used for a new project.
2. How do I clean a breadboard?
To clean a breadboard, use a soft brush or compressed air to remove any dust or debris from the holes. Avoid using water or cleaning solvents, as they can damage the breadboard or leave residue that affects electrical connections.
3. Can I use a breadboard for high-voltage circuits?
No, breadboards are not designed for high-voltage circuits. The plastic material and metal clips used in breadboards have limited voltage and current ratings. Always follow the manufacturer’s specifications and exercise caution when working with high voltages.
4. Are there different sizes of breadboards available?
Yes, breadboards come in various sizes to accommodate different project needs. Common sizes include full-size (typically 830 tie-points), half-size (typically 400 tie-points), and mini (typically 170 tie-points) breadboards.
5. Can I use a breadboard for permanent installations?
No, breadboards are intended for temporary prototyping and are not suitable for permanent installations. For permanent circuits, it is recommended to create a soldered PCB or use other suitable methods for robust and reliable connections.
Conclusion
Breadboards are an essential tool for anyone involved in electronic circuit prototyping. They provide a quick, easy, and reusable way to construct and test circuits without the need for soldering. By understanding the structure and limitations of breadboards, as well as following best practices for their use, designers and engineers can effectively prototype and iterate on their designs before transitioning to permanent PCBs.
As technology continues to advance, breadboards remain a fundamental tool in the electronics industry. They enable rapid experimentation, learning, and innovation, making them indispensable for students, hobbyists, and professionals alike. By mastering the use of breadboards, one can unlock a world of possibilities in electronic circuit design and prototyping.


Leave a Reply