What is an ESP32?
The ESP32 is a series of low-cost, low-power system-on-a-chip (SoC) microcontrollers with integrated Wi-Fi and dual-mode Bluetooth capabilities. It is developed by Espressif Systems, a Shanghai-based Chinese company. The ESP32 consists of a Tensilica Xtensa LX6 microprocessor, which can be clocked at up to 240 MHz, and includes built-in antenna switches, RF balun, power amplifier, low-noise receive amplifier, filters, and power management modules.
Advantages of ESP32 over other microcontrollers
| Feature | ESP32 | Arduino Uno | Raspberry Pi |
|---|---|---|---|
| Processor | Dual-core Xtensa LX6 | ATmega328P | Broadcom BCM2837 |
| Clock Speed | Up to 240 MHz | 16 MHz | 1.4 GHz |
| RAM | 520 KB | 2 KB | 1 GB |
| Flash Memory | 4 MB | 32 KB | MicroSD card |
| Wi-Fi | Built-in | Requires additional shield | Built-in (Pi 3 and later) |
| Bluetooth | Built-in (Classic and BLE) | Requires additional shield | Built-in (Pi 3 and later) |
| GPIO Pins | 36 | 14 | 40 |
| ADC Resolution | 12-bit | 10-bit | N/A |
| Operating Voltage | 2.2V to 3.6V | 5V | 5V |
| Power Consumption | Low | Moderate | High |
| Cost | Low | Low | Moderate |
As evident from the table above, the ESP32 outperforms the Arduino Uno and Raspberry Pi in several aspects, making it an attractive choice for low-power, low-cost projects.

Getting Started with ESP32
To start working with the ESP32, you’ll need the following:
- An ESP32 development board
- A USB cable for programming and power
- A computer with the Arduino IDE installed
Setting up the Arduino IDE for ESP32
- Open the Arduino IDE
- Go to File > Preferences
- In the “Additional Boards Manager URLs” field, enter:
https://dl.espressif.com/dl/package_esp32_index.json - Click “OK” to close the Preferences window
- Go to Tools > Board > Boards Manager
- Search for “esp32” and install the “ESP32 by Espressif Systems” package
- Select your ESP32 board from Tools > Board menu
Now you’re ready to start creating projects with the ESP32!

ESP32 Project Ideas
1. Weather Station
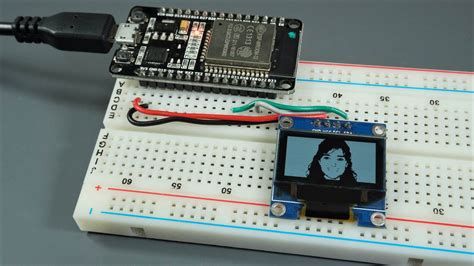
Build a low-power, Wi-Fi-enabled weather station using an ESP32, a BME280 temperature, humidity, and pressure sensor, and an OLED display. The ESP32 can periodically measure environmental data and display it on the OLED screen, while also sending the data to a web server for remote monitoring.
2. Smart Home Automation
Create a smart home automation system using an ESP32, relay modules, and various sensors like motion detectors, door/window sensors, and temperature sensors. The ESP32 can communicate with the sensors and control appliances through the relay modules based on user-defined rules or remote commands sent via a web interface or mobile app.
3. Fitness Tracker
Develop a wearable fitness tracker using an ESP32, an OLED display, and an MPU6050 accelerometer and gyroscope sensor. The ESP32 can track steps, calculate calories burned, and monitor sleep quality, while displaying the data on the OLED screen and syncing it with a mobile app via Bluetooth.
4. Remote-Controlled Robot
Build a low-cost, remote-controlled robot using an ESP32, DC motors, and a motor driver. The ESP32 can receive commands from a web interface or mobile app over Wi-Fi and control the robot’s movements accordingly. Add sensors like ultrasonic distance sensors or infrared sensors for obstacle avoidance.
5. Environmental Monitoring System
Create an environmental monitoring system using an ESP32, a PMS5003 particulate matter sensor, a CCS811 Air Quality Sensor, and a GPS module. The ESP32 can measure air quality, PM2.5, and PM10 levels, and log the data along with GPS coordinates to a web server for analysis and visualization.

Frequently Asked Questions (FAQ)
-
What is the difference between the ESP32 and ESP8266?
The ESP32 is a more advanced version of the ESP8266, featuring a dual-core processor, more RAM and flash memory, built-in Bluetooth, and a higher number of GPIO pins. The ESP32 also has better power management and can operate at lower voltages compared to the ESP8266. -
Can I use the ESP32 with the Arduino IDE?
Yes, you can use the ESP32 with the Arduino IDE by installing the ESP32 board package through the Boards Manager. This allows you to write and upload sketches to the ESP32 using the familiar Arduino programming language and libraries. -
What is the operating voltage of the ESP32?
The ESP32 can operate at voltages between 2.2V and 3.6V, with a typical operating voltage of 3.3V. It is essential to ensure that the input voltage and any connected peripherals are within this range to avoid damaging the ESP32. -
How much power does the ESP32 consume?
The power consumption of the ESP32 depends on factors like clock speed, Wi-Fi and Bluetooth usage, and the number of active peripherals. On average, the ESP32 consumes around 30-100 mA during normal operation and can go as low as 5 µA in deep sleep mode. -
What is the range of the ESP32’s Wi-Fi and Bluetooth?
The ESP32’s Wi-Fi range depends on factors like the environment, antenna design, and output power. In ideal conditions, the ESP32 can achieve a Wi-Fi range of up to 100 meters. The Bluetooth range is typically shorter, around 10-20 meters, depending on the Bluetooth version (Classic or BLE) and output power.
In conclusion, the ESP32 is a versatile, low-power, and low-cost microcontroller that offers endless possibilities for creating innovative projects. Its built-in Wi-Fi and Bluetooth capabilities, combined with its powerful processor and extensive GPIO pins, make it an ideal choice for hobbyists and professionals alike. By following the getting started guide and exploring the project ideas mentioned in this article, you can begin your journey into the world of ESP32 Projects and bring your ideas to life.


Leave a Reply