What is a Battery Charger?
A battery charger is a device used to put energy into a rechargeable battery by forcing an electric current through it. The charging protocol depends on the size and type of battery being charged. Some battery chargers are stand-alone units, while others are built into the devices they power, such as cell phones, laptops, and electric cars.
Types of Rechargeable Batteries
There are several common types of rechargeable batteries that can be charged with a DIY battery charger:
| Battery Type | Nominal Voltage | Common Applications |
|---|---|---|
| Nickel-Cadmium (NiCd) | 1.2V | Power tools, two-way radios, RC vehicles |
| Nickel-Metal Hydride (NiMH) | 1.2V | Digital cameras, electric toothbrushes, handheld electronics |
| Lithium-Ion (Li-ion) | 3.6V/3.7V | Smartphones, tablets, laptops, cordless tools |
| Lead-Acid | 6V/12V | Automotive, marine, backup power |
Each battery type has different charging requirements, so it’s important to use the right kind of charger for the batteries you want to recharge.

Basic Components of a Battery Charger
All battery chargers have a few key components:
-
Power Source – This can be AC power from a wall outlet or DC power from a car battery or solar panel. The voltage and current must be compatible with the battery being charged.
-
Transformer – Steps down the high voltage AC power to a lower voltage suitable for the battery. Not needed for low voltage DC power sources.
-
Rectifier – Converts AC power to DC for charging the battery. Typically uses a diode bridge circuit.
-
Voltage Regulator – Maintains a constant voltage level to the battery as it charges. Prevents overcharging which can damage the battery.
-
Current Limiter – Regulates the maximum current that can flow to the battery. Important for safely charging small capacity batteries.
-
Charge Controller – Monitors battery voltage and/or temperature and adjusts the charging cycle accordingly. More advanced chargers may have microprocessor controlled charge stages.

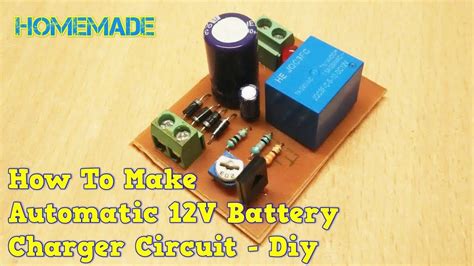
Step-by-Step Guide to Building a Basic DIY Battery Charger
Tools and Materials Needed
- AC adapter or DC power source
- Transformer (for AC power)
- Diode bridge rectifier
- Voltage regulator (e.g. LM317)
- Current limiting resistor
- Battery holder
- Wires and connectors
- Soldering iron and solder
- Multimeter
- Breadboard (optional)
Step 1: Determine Voltage and Current Requirements
First, identify the type and capacity of battery you want to charge. Refer to the Battery Specifications or look up the charging requirements for that battery type. The voltage output of your charger must match the battery voltage. The current should be set to between 10-30% of the battery’s amp-hour (Ah) capacity. For example, a 2000mAh NiMH battery can be safely charged at 200-600mA.
Step 2: Select and Prepare Power Source
If using AC power, choose an AC adapter that outputs a higher voltage than your battery, typically 3-12V for small batteries. Cut off the adapter’s DC plug and strip the wires. If using a DC source like a 12V car battery, make sure the voltage matches your charging circuit.
Step 3: Assemble the Charging Circuit
On a breadboard or PCB, assemble the components as follows:
1. Connect the rectifier diodes to convert AC to DC (skip for DC power).
2. Attach the voltage regulator configured to output your desired battery voltage.
3. Calculate and connect the current limiting resistor in series.
4. Add the battery holder with its positive terminal connected to the circuit’s positive voltage.
Refer to voltage regulator datasheets for the specific wiring diagram. Use a multimeter to verify the output voltage is correct.
Step 4: Charge the Battery
Place the battery in the holder and connect the power source. Monitor the battery voltage and temperature periodically. Most batteries are fully charged when they reach 1.4-1.5V per cell. Disconnect power once charging is complete. Never leave a charging battery unattended.

Advanced DIY Battery Charger Features
More sophisticated DIY battery chargers can include additional features such as:
- Charge Status Indicators – LEDs to show when battery is charging, fully charged, or faults occur.
- Multiple Charging Stages – Applies different currents and voltages depending on the battery’s charge level to optimize charging time and battery life.
- Temperature Monitoring – Uses a thermistor or temperature sensor to prevent overheating during charging.
- Microcontroller Circuit – Allows programming customized charging routines and safeties.
- LCD Display – Shows real-time voltage, current, capacity, and other data.
- USB Connectivity – Enables logging data to a computer or updating firmware.
Building these advanced features requires additional electronic components and programming skills. There are many open-source battery charger circuits available online to use as a starting point.
Safety Precautions
Working with batteries and electrical circuits can be dangerous if proper precautions aren’t followed. Always keep these safety guidelines in mind:
- Wear eye protection and avoid touching exposed metal contacts.
- Work in a well-ventilated area away from flammable materials.
- Use a fire-resistant surface and keep a fire extinguisher nearby.
- Never attempt to charge a damaged or leaking battery.
- Don’t leave batteries charging unattended or overcharge them.
- Disconnect power before making any wiring changes.
- Use insulated tools and double-check polarities before connecting.
Troubleshooting Common Issues
| Problem | Possible Causes | Solutions |
|---|---|---|
| Battery not charging | Loose/incorrect wiring, blown fuse, defective component | Double-check all connections, test voltage output, replace any faulty parts |
| Battery overheating | Charging current too high, short circuit | Disconnect charger immediately, verify current limiting circuit, check for shorts |
| Charger gets hot | Insufficient heat sinking, airflow | Use larger heat sink on voltage regulator, add a fan for cooling |
| Inaccurate voltage | Bad voltage regulator, incorrect resistor values | Recheck circuit against datasheet, use multimeter to measure output |
If you can’t resolve an issue after troubleshooting, it’s best to start over with a new circuit to avoid damaging the battery or causing a safety hazard.
FAQ
What is the best type of rechargeable battery?
It depends on the application, but Lithium-ion and Nickel-Metal Hydride batteries are the most popular for their high energy density and low self-discharge rates. Lead-acid batteries are still used for high-power applications like vehicles and backup systems.
Is it cheaper to build my own battery charger?
Building a basic DIY charger can be cheaper than buying a commercial unit, especially if you already have some of the parts. However, more advanced chargers with features like microprocessor control and multiple charging modes can be more expensive to build yourself.
How long does it take to charge a battery?
Charging time depends on the battery capacity and charger current. At a 0.5C charge rate, a battery will take about 2-3 hours to charge. Lower currents take longer but are gentler on the battery. Some fast chargers can charge a battery in under an hour.
Can I charge different types of batteries with the same charger?
Not necessarily. Different battery chemistries have different charging requirements. Lithium-ion and lead-acid batteries in particular need specialized chargers for safety reasons. It’s best to build or buy a charger designed for the specific battery type you want to charge.
What should I do with my old batteries?
Don’t throw them in the trash, as they contain toxic chemicals that can harm the environment. Many electronics stores and local waste facilities have battery recycling programs. You can also check with the manufacturer for take-back options.
Conclusion
Building your own DIY-Battery-Chargers can be a fun and rewarding project that saves you money in the long run. By understanding the basic components and following proper safety precautions, anyone can make a simple charger at home. However, more advanced chargers may require additional skills and resources.
When in doubt, it’s always best to refer to the manufacturer’s charging specifications and use a commercially-made charger if you’re not confident in your ability to build a safe and effective DIY version. With the right knowledge and tools though, you can keep all your battery-powered devices charged up and ready to go.


Leave a Reply