Introduction to Flashlight Circuits
A flashlight circuit is a simple electrical circuit that powers a light bulb or LED to provide portable illumination. Flashlights are handy devices to have around for emergencies, power outages, camping trips, or any time you need some extra light. While you can easily purchase flashlights at most stores, it can be a fun and educational project to build your own DIY flashlight circuit from scratch.
In this article, we’ll go over the basics of how flashlight circuits work and provide step-by-step instructions for constructing your own simple flashlight. Whether you’re an electronics hobbyist, student, or just curious about how things work, building a flashlight circuit is a great way to learn about electrical components and gain some hands-on experience with circuitry. Let’s get started!
How Flashlight Circuits Work
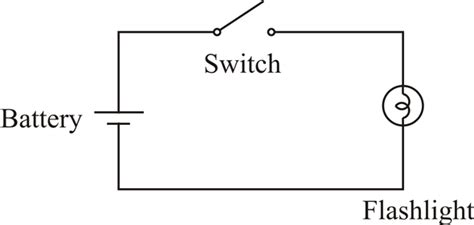
At its most basic, a flashlight circuit consists of three main components:
- Power source (battery)
- Switch
- Light emitter (bulb or LED)
When the switch is closed (turned on), it completes the circuit and allows current to flow from the battery, through the light emitter, and back to the battery. This current causes the light to turn on and produce illumination. Opening the switch breaks the circuit and turns the light off.
Here’s a simple diagram illustrating the basic components and current flow in a flashlight circuit:
   +---------+
   |         |
   | Battery |
   |         |
   +--+---+--+
      |   |
      |   |
     (on) (off)
      |   |
      +   +
      |   |
      |   |
+-----+---+-----+
|               |
|   Light       |
|   Emitter     |
|               |
+---------------+
The battery provides the voltage source that drives current through the circuit. The higher the battery voltage, the brighter the light will shine. Common Battery Types for flashlights include AA, AAA, C, D, and 9V.
The switch controls the flow of current in the circuit. When the switch is in the on position, it creates a closed loop that allows current to flow and turns on the light. When the switch is off, it creates an open circuit that blocks the flow of current. Flashlight switches are often push-button or slide types.
Finally, the light emitting component can either be an incandescent bulb or a light-emitting diode (LED). Incandescent bulbs contain a thin wire filament that glows when current passes through it. LEDs are more energy efficient and produce light through electroluminescence.

Flashlight Circuit Schematics
Before we start building, it’s helpful to understand how to read a flashlight circuit schematic diagram. A schematic uses symbols to represent the various components and shows how they are connected together.
Here are the common schematic symbols you’ll encounter for basic flashlight circuits:
| Symbol | Component |
|---|---|
| Battery | |
| Switch | |
| Incandescent Bulb | |
| LED | |
| Resistor |
A basic flashlight schematic with an incandescent bulb looks like this:
   +---------+
   |         |
   | Battery |
   |         |
   +--+---+--+
      |   |
      |   +-----+
     (on) (off) |
      |         |
      +         |
      |         |
      +---------+
          Bulb
And here’s the schematic for an LED flashlight circuit:
    +---------+
    |         |
    | Battery |
    |         |
    +--+---+--+
       |   |
       |   +----+
      (on) (off)|
       |        |
       +-->|--+-+
        Resistor
           LED
The resistor is included to limit the current through the LED and prevent it from burning out. The arrow in the LED symbol indicates the direction of conventional current flow when the LED is forward biased and emitting light.

Materials Needed
Now that we understand the basics, let’s gather the materials needed to build a simple flashlight circuit. Here’s what you’ll need:
- Battery holder – holds 2 AA batteries
- AA batteries (2)
- Slide switch
- LED
- Resistor (330 ohm)
- Hookup wire
- Soldering iron and solder
- Wire strippers
- Scissors or wire cutters
- Flashlight housing (optional)
You can find these components at electronics stores or online retailers. Make sure to choose an LED and resistor that are compatible with your battery voltage. A 330 ohm resistor works well for two 1.5V AA batteries in series (3V total).

Step-by-Step Instructions
Follow these steps to construct your DIY LED flashlight circuit:
-
If using a flashlight housing, disassemble it and remove any existing components. Otherwise, you can build the circuit on a Breadboard or freestyle it.
-
Solder the positive (red) wire of the battery holder to one of the terminals on the switch.
-
Solder one end of the resistor to the other terminal on the switch.
-
Identify the anode (positive) lead of the LED, which is usually the longer one. Solder the other end of the resistor to the LED anode.
-
Solder a wire between the negative (black) wire of the battery holder and the cathode (negative, shorter lead) of the LED.
-
Insert the batteries into the holder, matching the + and – terminal markings.
-
Slide the switch to the on position, and the LED should light up! If not, double check your connections and component orientations.
-
Once you’ve confirmed the circuit works, you can nestle the components into a flashlight housing if desired. Secure everything in place to avoid any loose wires.
-
Congratulations, you’ve just built your own flashlight circuit! Wasn’t that en-LIGHT-ening? Feel free to experiment with different LEDs, battery configurations, and switch types.
Flashlight Circuit Troubleshooting
If your flashlight circuit isn’t working as expected, here are some troubleshooting tips:
- Check that the batteries are inserted in the correct orientation and making good contact with the holder terminals. Try swapping in fresh batteries.
- Verify that the switch is functional and properly connected. Bypass the switch by touching the wires together to isolate the issue.
- Make sure the LED is oriented correctly. The anode should connect to the resistor/switch, and the cathode to the negative battery terminal.
- Inspect your solder joints and wiring for any shorts, cold joints, or broken connections. Resolder if needed.
- Confirm you are using a suitable resistor value for your battery voltage and LED specs. An improper value can cause the LED to burn out or be too dim.
Advanced Flashlight Circuit Modifications
Once you’ve mastered the basic flashlight circuit, you can try out some modifications and enhancements, such as:
- Adding multiple LEDs in parallel for a brighter light
- Using a dimmer switch or potentiometer for adjustable brightness control
- Incorporating a joule thief circuit to boost battery voltage for nearly depleted batteries
- Upgrading to rechargeable lithium ion batteries and adding a charging circuit
- Integrating a microcontroller and programmable effects like strobing or color changing RGB LEDs
The possibilities are endless! With some creativity and experimentation, you can customize your flashlight circuit to suit your needs and learn even more about electronics in the process.
FAQ
Can I use any type of battery for a flashlight circuit?
Flashlight circuits can be powered by a variety of battery types, but the most common are AA, AAA, C, D, and 9V. The battery voltage should match the LED and resistor specifications for optimal performance. Avoid mixing different battery types or using severely depleted batteries.
How do I calculate the resistor value for my LED flashlight circuit?
To calculate the proper resistor value, you’ll need to know the battery voltage and the LED’s forward voltage and current ratings. Then, use Ohm’s law: Resistance = (Battery Voltage – LED Forward Voltage) / LED Current. For example, with a 3V battery and a typical 20mA LED with a 2V forward voltage, the resistor value would be (3V – 2V) / 0.02A = 50 ohms.
What’s the difference between an incandescent bulb and an LED in a flashlight circuit?
Incandescent bulbs and LEDs are both light emitting components used in flashlight circuits, but they have some key differences:
| Feature | Incandescent Bulb | LED |
|---|---|---|
| Efficiency | Low (~5% of energy converted to light) | High (~50% conversion efficiency) |
| Durability | Fragile glass and filament construction | Solid state, shockproof |
| Lifespan | Short (~1000 hours) | Long (50,000+ hours) |
| Color | Warm, yellowish hue | Various colors available, including white |
| Directionality | Omnidirectional | Directional beam |
| Dimming | Easily dimmable | Requires PWM or constant current dimming |
| Heat Generation | High | Low |
| Cost | Cheap | Slightly more expensive |
In general, LEDs are the preferred choice for modern flashlights due to their superior efficiency, durability, and longevity.
Can I use a flashlight circuit to charge my phone or other devices?
No, a basic flashlight circuit is designed to power a light emitting component only and does not have the necessary components or output specifications to charge electronic devices like phones. Charging circuits are more complex and require voltage regulation, current limiting, and proper connectors. Attempting to charge devices with a flashlight circuit can be dangerous and may damage your devices or cause battery issues.
What should I do if my flashlight circuit stops working?
If your flashlight circuit suddenly stops working, first try the troubleshooting steps listed earlier in this article, such as checking the battery, switch, and connections. If the problem persists, you may need to replace components like the LED, resistor, or switch. It’s also a good idea to periodically clean the battery contacts and housing to ensure reliable operation. If all else fails, it may be time to build a new flashlight circuit from scratch using fresh components.
Conclusion
Congratulations on making it to the end of this comprehensive guide on building your own flashlight circuit! We’ve covered the basics of flashlight circuit operation, schematics, components, and step-by-step assembly instructions. Remember, building circuits is all about experimentation and learning from mistakes. Don’t get discouraged if your first attempt doesn’t work perfectly – troubleshoot, make adjustments, and keep trying.
As you continue to explore the world of electronics, you’ll discover countless ways to modify and enhance your flashlight circuit. Who knows, you may even invent the next big breakthrough in portable lighting technology! So go forth, and let your DIY flashlight circuit brilliantly light the way on your electronics journey.


Leave a Reply