Introduction to Nixie Tubes and Nixie Clocks
Nixie tubes are a type of cold cathode display device that were widely used in electronic equipment from the 1950s to the 1970s. These tubes contain a wire-mesh anode and multiple cathodes, each shaped like a numeral or symbol. When a voltage is applied to a cathode, it glows with a distinctive orange color, displaying the corresponding digit or symbol.
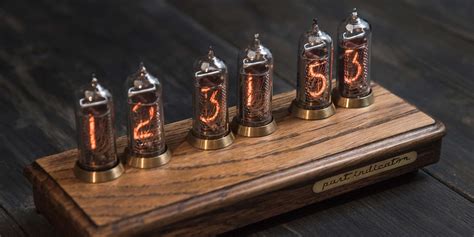
In recent years, Nixie tubes have experienced a resurgence in popularity, particularly among electronics enthusiasts and makers who appreciate their unique aesthetic and retro charm. One popular project involving Nixie tubes is the creation of Nixie tube clocks, which combine the vintage display technology with modern electronics to create functional and visually striking timepieces.
How Nixie Tubes Work
Nixie tubes operate on the principle of cold cathode discharge. Each tube contains a wire-mesh anode and multiple cathodes, which are shaped like numerals or symbols. The tube is filled with a low-pressure neon gas and a small amount of mercury.
When a high voltage (usually between 170V and 200V DC) is applied between the anode and one of the cathodes, the gas around the cathode ionizes and glows with a distinctive orange color. By selectively applying voltage to different cathodes, the desired digit or symbol can be displayed.
Advantages and Disadvantages of Nixie Tubes
Nixie tubes have several advantages over other display technologies:
- Aesthetics: Nixie tubes have a unique, warm, and retro appearance that many people find appealing.
- Viewing angle: Nixie tubes can be easily read from a wide range of viewing angles.
- Durability: When properly cared for, Nixie tubes can last for decades.
However, Nixie tubes also have some disadvantages:
- Power consumption: Nixie tubes require relatively high voltages and currents to operate, making them less energy-efficient than modern display technologies.
- Fragility: Nixie tubes are made of glass and can be easily damaged if handled roughly.
- Limited availability: As Nixie tubes are no longer mass-produced, they can be expensive and difficult to source.
Building a Nixie Tube Clock Without a PCB
While many Nixie tube clock projects rely on custom-designed printed circuit boards (PCBs) to simplify construction and ensure a professional-looking final product, it is possible to build a Nixie tube clock without using a PCB. This approach can be advantageous for those who want to experiment with different layouts or who prefer a more freeform construction style.
Components Required
To build a Nixie tube clock without a PCB, you will need the following components:
- Nixie tubes (4 or 6, depending on whether you want to display hours and minutes, or hours, minutes, and seconds)
- High-voltage power supply (170V-200V DC)
- Microcontroller (e.g., Arduino)
- Resistors (for current limiting)
- Transistors (for switching the high voltage)
- Real-time clock module (for timekeeping)
- Buttons (for setting the time)
- Wiring and connectors
- Enclosure or case
Step-by-Step Guide
1. Plan your layout
Before you start building, it’s important to plan the layout of your Nixie tube clock. Consider the size and shape of your enclosure, the placement of the Nixie tubes, and the locations of the buttons and other components.
2. Prepare the high-voltage power supply
Use a high-voltage DC power supply capable of providing the necessary voltage and current for your Nixie tubes. Many builders opt for a pre-built module or a custom-designed switching power supply.
3. Connect the microcontroller
Wire the microcontroller to the real-time clock module, buttons, and transistors. The microcontroller will be responsible for keeping time, updating the display, and responding to user input.
4. Wire the Nixie tubes
Connect each Nixie tube to the high-voltage power supply through current-limiting resistors and the switching transistors. Take care to ensure that the connections are secure and well-insulated, as the high voltages involved can be dangerous.
5. Program the microcontroller
Write the necessary code for your microcontroller to keep time, update the Nixie tube display, and respond to button presses. There are many example sketches available online for various microcontroller platforms that can serve as a starting point.
6. Test and debug
Before final assembly, thoroughly test your Nixie tube clock to ensure that all components are working correctly and that the display is updating as expected. Debug any issues that arise and make necessary adjustments.
7. Assemble the enclosure
Once you are confident that your Nixie tube clock is functioning properly, assemble the components into your chosen enclosure. Take care to securely mount the Nixie tubes and ensure that all wiring is neat and well-organized.
Tips and Tricks
- Use heat-shrink tubing to insulate exposed connections and improve the overall appearance of your wiring.
- Consider adding a dimming feature to your Nixie tube clock to reduce power consumption and extend the life of the tubes.
- Experiment with different Nixie tube models and colors to create a unique look for your clock.
- Use a clear acrylic or glass front panel to protect the Nixie tubes while allowing them to be easily visible.

Frequently Asked Questions (FAQ)
1. Can I use any type of Nixie tube for a Nixie clock?
While most Nixie tubes can be used in a clock, some models are better suited for this application than others. The most commonly used Nixie tubes for clocks are the IN-14, IN-8-2, and IN-12 models, as they are relatively compact and have a clear, easily readable display.
2. How long do Nixie tubes last?
With proper care and usage, Nixie tubes can last for decades. However, the lifespan of a Nixie tube can be shortened by factors such as excessive current, overheating, or physical damage.
3. Are Nixie tubes dangerous?
Nixie tubes require high voltages to operate, which can be dangerous if not handled properly. Always take appropriate safety precautions when working with high-voltage electronics, and ensure that all connections are secure and well-insulated.
4. Can I use a different microcontroller instead of an Arduino?
Yes, you can use any microcontroller that has enough I/O pins and is capable of communicating with the real-time clock module and controlling the switching transistors. Some popular alternatives to the Arduino include the Raspberry Pi, ESP8266, and PIC microcontrollers.
5. How do I set the time on a Nixie tube clock?
Most Nixie tube clock designs incorporate buttons that allow the user to set the time. Typically, one button is used to select the digit to be adjusted (hours, minutes, or seconds), while another button is used to increment the selected digit. The exact process may vary depending on the specific design and programming of your clock.

Conclusion
Building a Nixie tube clock without a PCB can be a challenging but rewarding project for electronics enthusiasts and makers. By following the steps outlined in this article and paying close attention to safety precautions, you can create a unique and visually stunning timepiece that showcases the beauty and charm of Nixie tubes.
Remember to plan your layout carefully, use appropriate components, and thoroughly test your clock before final assembly. With patience and perseverance, you’ll be able to enjoy the warm, retro glow of your very own Nixie tube clock for years to come.


Leave a Reply